Wednesday, August 19, 2009

Parameterized tests in NUnit

In an earlier post I showed how to pass parameters to test methods using an NUnit RowTest extension. As of version 2.5, the extensions are no longer packaged with the NUnit installer. The good news is that the addition of parameterized tests replaces the RowTest and adds a number of new features as well.

For reference, my previous RowTest looked like this:

[RowTest]
[Row(2, 3)]
[Row(-1, -4)]
public void AddTwoNumbers(int x, int y)
{
    Assert.AreEqual(x + y, Add(x, y),
        "Add returned incorrect result");
}

A basic switch to a parameterized test is a matter of dropping the RowTest attribute and replacing each Row attribute with a similarly-formatted TestCase attribute. The new code, which creates two distinct tests as before, looks like this:

[TestCase(2, 3)]
[TestCase(-1, -4)]
public void AddTwoNumbers(int x, int y)
{
    Assert.AreEqual(x + y, Add(x, y),
        "Add returned incorrect result");
}

In addition to single parameters you can now specify ranges. If I want to test values of X from 1 to 5, with a Y value of 1, I can do so using the Range and Values attributes, like so:

[Test]
public void AddTwoNumbers(
                    [Range(1, 5)]int x,
                    [Values(1)]int y)
{
    Assert.AreEqual(x + y, Add(x, y),
        "Add returned incorrect result");
}        

In the test runner, this shows up as five distinct unit tests


If I specify the range 1-5 for both X and Y, NUnit defaults to creating 25 unique tests. This is the default Combinatorial attribute.


If I wish to use a value from each range only once, I instead mark the test as Sequential

[Test, Sequential]
public void AddTwoNumbers(
                    [Range(1, 5)]int x,
                    [Range(1, 5)]int y)
{
    Assert.AreEqual(x + y, Add(x, y),
        "Add returned incorrect result");
}        

which produces the desired effect
Wednesday, August 12, 2009

Save WinForm control values between executions

Say I have a test application that submits info to a webservice. Because this webservice has a few issues, I may need to retry a request several times to get a valid response. I've added a control to set the number of retries.


Specifying the control's Value property at design-time sets the starting value at runtime. If a user wants to set a different value, he must do so each time he starts the app. To make things more user-friendly it would be better to save the control's value between executions.

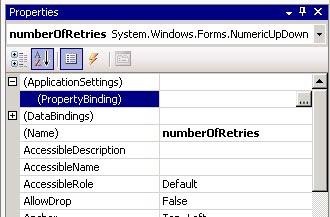
To do so, start by selecting the desired control in the designer. In the Properties window, expand the ApplicationSettings entry and select the ellipsis (...) for the PropertyBinding sub-entry.


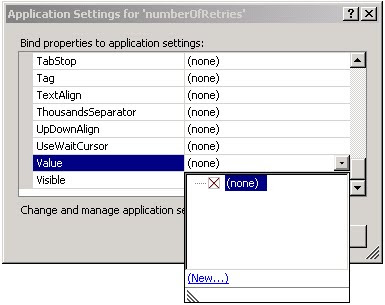
In the Application Settings dialog that appears, select the dropdown next to the 'Value' entry, as this is the property we wish to persist.


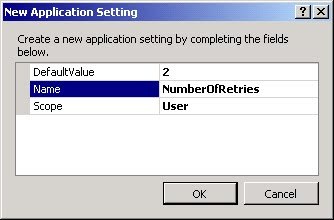
Select the '(New...)' link from the popup, which brings up the New Application Setting dialog.


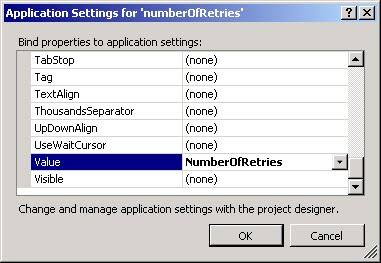
Specify the default value and name of the config setting (and modify the Scope if necessary) and press OK. This will update the Application Settings dialog to show the newly added entry.


Press OK to close the dialog. With the property binding set, the application will automatically load the value at startup. The only thing left is to save the modified value. In the form's FormClosing event handler, add the following line:

Properties.Settings.Default.Save();


At this point the change is ready to test. Start the application and modify the control's value. Without doing anything else, close the application. Now restart the app. Note the control contains the modified value.

It would seem the desired functionality is complete but there is one more item that needs to address. If you look for the saved settings file, you will find it under

C:\Documents and Settings\<username>\Local Settings\Application Data\<Company>\<AppName>\<version>

If the version number for the application is changed, the previously saved setting won't be loaded. The application needs to know to upgrade the saved settings the first time it runs.

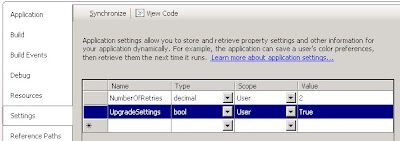
Start by adding a new application setting called UpgradeSettings. This will be used to make sure we only upgrade the settings once. Otherwise, any newly saved settings will be replaced by the previous version's settings every time the app starts.


The final step is to add the upgrade logic to Program.cs. In the Main method, add the following code immediately before the call to Application.Run.

if (Convert.ToBoolean(Properties.Settings.Default["UpgradeSettings"]))
{
    Properties.Settings.Default.Upgrade();
    Properties.Settings.Default["UpgradeSettings"] = false;
}