Yes, you read that right. The client I'm currently assigned to has a significant amount of legacy code in VB6. Not an ideal situation, but at least it isn't COBOL.
Anyway, one of the first things I noticed after loading a project was that I couldn't scroll through the code using the mouse wheel. It turns out the VB6 IDE didn't include wheel support. Fortunately, there's an add-in from Microsoft that fixes this. See KB article 837910 for the download and install instructions.
And yes, I'm aware that this probably doesn't pertain to you (if it does, I feel your pain.) The post is mainly a bookmark for my own reference. Any sympathy it generates is just a bonus :)
Friday, May 9, 2008
Thursday, May 8, 2008
DotNetMigrations
A friend of mine recently ported the Ruby on Rails "Migrations" tool to .Net. Assuming you can get all of the developers on a team to script out their database changes (and matching rollbacks) this tool will make it easier to build, update and deploy your database. It also becomes trivial to revert the changes when something breaks unexpectedly.
You can find details here.
You can find details here.
Adding entries to a file's right-click menu
When setting up a new developer computer, there are a number of tools and shortcuts I typically want. One of these is the ability to register COM dlls through Explorer's right-click menu. The easiest way to add this is through the registry.
Standard warning: I'm sure you're aware that messing with the registry may cause all sorts of problems. Proceed with caution. Unless of course it's not your computer you're messing with. In which case, hack away.
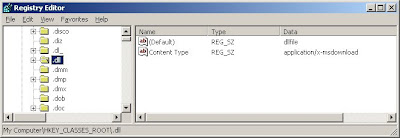
Start regedit from the Run dialog (keyboard shortcut: Win+R.) Under HKCR (HKEY_CLASSES_ROOT) locate the extension of the file to modify - .dll in this case. In the list of properties, you should see a "(Default)" string with the internal name of the file type. For dll it will be "dllfile."
Further down, still under HKCR, will be an entry for dllfile. This is where the changes will be made.
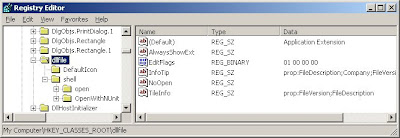
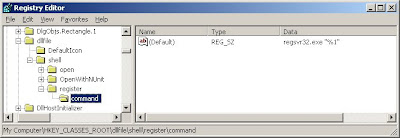
Under dllfile, expand the "shell" key. Add a new key and set the name as you want it to appear on the right-click menu (mine is "register".) Within that, add another key with the value "command." The "(Default)" string needs be set to the command that you want to run. For this exercise it will be:
regsvr32.exe "%1"
Regsvr32 is the command-line utility to register the COM component. The %1 in quotes tells Windows to pass in the filename and path as the first parameter.
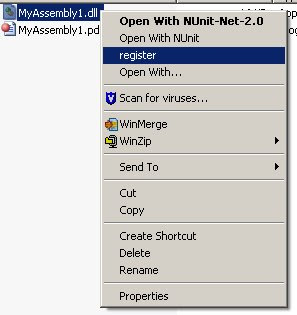
Once this is done, you should be able to right-click on any dll and see the new entry.
This takes care of one machine. Now that you have the shortcut defined, it would be useful to copy this to other machines. To do so, right-click on the "register" key and choose Export. Saving the selected branch will give you a .reg file with the changes. Copy the file to another computer and double-click to import it into the registry of that computer.
Standard warning: I'm sure you're aware that messing with the registry may cause all sorts of problems. Proceed with caution. Unless of course it's not your computer you're messing with. In which case, hack away.
Start regedit from the Run dialog (keyboard shortcut: Win+R.) Under HKCR (HKEY_CLASSES_ROOT) locate the extension of the file to modify - .dll in this case. In the list of properties, you should see a "(Default)" string with the internal name of the file type. For dll it will be "dllfile."

Further down, still under HKCR, will be an entry for dllfile. This is where the changes will be made.

Under dllfile, expand the "shell" key. Add a new key and set the name as you want it to appear on the right-click menu (mine is "register".) Within that, add another key with the value "command." The "(Default)" string needs be set to the command that you want to run. For this exercise it will be:
regsvr32.exe "%1"
Regsvr32 is the command-line utility to register the COM component. The %1 in quotes tells Windows to pass in the filename and path as the first parameter.

Once this is done, you should be able to right-click on any dll and see the new entry.

This takes care of one machine. Now that you have the shortcut defined, it would be useful to copy this to other machines. To do so, right-click on the "register" key and choose Export. Saving the selected branch will give you a .reg file with the changes. Copy the file to another computer and double-click to import it into the registry of that computer.
Friday, May 2, 2008
Metadata? But the code's right there...
Here's a highly complex bit of code I've been working on
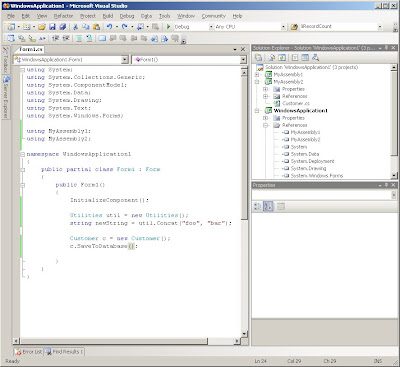
In this example I have a Customer class in MyAssembly2, which you can see is a separate project in the solution. On the main form of the application I'm making a call to the Customer instance method SaveToDatabase. If I right-click on the method call and choose "Go To Definition" I'm taken to a page of metadata.
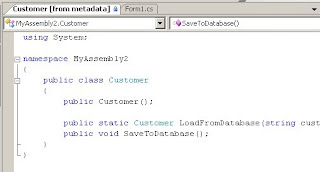
This lets me see method signatures but not the code within those methods. If I were to try the same thing for my Utilities class, however, I'm taken to the .cs file within MyAssembly1. So what's the difference?
Here are the reference properties for the two assemblies:
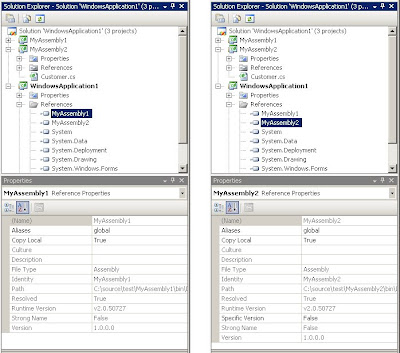
The two are almost identical, but if you look closely, you'll see that MyAssembly2 has a "Specific Version" property where MyAssembly1 does not. This is because MyAssembly2 was added as a file reference - we pointed VisualStudio at the compiled dll instead of the project. Because of this, VS doesn't know that the dll and project are really one and the same.
The fix is a simple matter of deleting the reference to MyAssembly2 and re-adding - this time as a project reference.

In this example I have a Customer class in MyAssembly2, which you can see is a separate project in the solution. On the main form of the application I'm making a call to the Customer instance method SaveToDatabase. If I right-click on the method call and choose "Go To Definition" I'm taken to a page of metadata.

This lets me see method signatures but not the code within those methods. If I were to try the same thing for my Utilities class, however, I'm taken to the .cs file within MyAssembly1. So what's the difference?
Here are the reference properties for the two assemblies:

The two are almost identical, but if you look closely, you'll see that MyAssembly2 has a "Specific Version" property where MyAssembly1 does not. This is because MyAssembly2 was added as a file reference - we pointed VisualStudio at the compiled dll instead of the project. Because of this, VS doesn't know that the dll and project are really one and the same.
The fix is a simple matter of deleting the reference to MyAssembly2 and re-adding - this time as a project reference.
Subscribe to:
Comments (Atom)