Friday, November 13, 2009

More than one way to sort a List<>

One operation you occasionally need to perform is sorting a generic list of objects. Often developers code handle with an inline delegate. If I wanted to sort a collection of boardgames by rating, my code might look like this:

  games.Sort(
      delegate(BoardGame a, BoardGame b)
      {
          if (a.Rating < b.Rating)
              return 1;
          if (a.Rating > b.Rating)
              return -1;
          return 0;
      });

Although this works, it tends to look a bit cluttered. It also increases a method's complexity and doesn't adhere to the idea of separation of concerns. If we only need to sort Boardgames in this one location, a better solution is to move the comparison code into a separate method in the same class. The new method looks like this:

  public int CompareBoardgamesByRank(BoardGame a, BoardGame b)
  {
      if (a.Rating < b.Rating)
          return 1;
      if (a.Rating > b.Rating)
          return -1;
      return 0;
  }

Our call to Sort looks like this:

  games.Sort(CompareBoardgamesByRank);

This makes the code much cleaner for a single sort. If we want to sort Boardgames by rating from multiple locations, we need a better place to store the comparison method. If we implement IComparable on our Boardgame class, we can create a CompareTo method on the class like so:

  public int CompareTo(object obj)
  {
      BoardGame b = (BoardGame)obj;
 
      if (Rating < b.Rating)
          return 1;
      if (Rating > b.Rating)
          return -1;
      return 0;
  }

Since the class now has a default comparison, we no longer need to specify a delegate when calling Sort - the CompareTo method will automatically be executed with an empty call:

  games.Sort();

What if we need additional comparison methods for our Boardgame? An easy way to handle this is to create static methods on the class, which will be available anywhere that Boardgame can be accessed. Here are a couple methods I've added to my Boardgame class:

  public static int CompareByName(BoardGame a, BoardGame b)
  {
      return string.Compare(a.Name, b.Name);
  }
 
  public static int CompareByRankAssending(BoardGame a, BoardGame b)
  {
      if (a.Rating > b.Rating)
          return 1;
      if (a.Rating < b.Rating)
          return -1;
      return 0;
  }

Which I can now pass into the Sort method:

  games.Sort(BoardGame.CompareByRankAssending);

Tuesday, October 20, 2009

Refactoring assemblies without breaking existing apps

Over time, most development shops identify common code that needs to be used across multiple projects. This code is eventually collected into a single assembly, usually something like Common.dll or Utilities.dll. In the beginning this is a decent way to eliminate code duplication. Over time, however, this single assembly becomes difficult to maintain.

At this point the obvious fix is to split the assembly into multiple smaller ones. Unfortunately, by then the single assembly is used on numerous projects. A major refactoring now requires extensive changes across all of these referencing applications. This realization usually stops any refactoring effort, leaving the utilities assembly to continue growing larger and more unwieldy.

To look at potential solutions, I've created a Utilities assembly with the following Logger class:

  namespace Utilities
  {
      public class Logger
      {
          public void LogError(string message)
          {
              Debug.WriteLine("Error: " + message);
          }
      }
  }

The goal is to move this class to a separate assembly called LoggingUtilities.

One solution is to use the TypeForwardedTo attribute. This is an assembly-level attribute that flags a specified class as having moved. To use this, I start by moving the Logger class to my new assembly. Note that I keep the same namespace as before - this is required for the forwarding to work.

Next I add a reference to LoggingUtilities within Utilities.


Finally, I open up AssemblyInfo.cs file in the Utilities project and add the following line:

  [assembly: TypeForwardedTo(typeof(Utilities.Logger))]

If I recompile the dlls and drop them in a folder with my existing application, it will continue to function even though the class has been moved.

This takes care of keeping the current compiled code running, but what about future versions? If I open up the source for one of my applications and attempt to compile, I now receive errors stating "The type or namespace name 'Logger' could not be found." It seems the redirection works at runtime but not at compile time. For someone not familiar with the previous refactoring, this could prove an interesting issue to track down.

In my opinion, there is a far better solution than using the TypeForwardedTo attribute. Going back to the original code, this time I copy the code to the new assembly (as opposed to moving it.) On the copy I change the namespace to match my new assembly.

  namespace LoggingUtilities
  {
      public class Logger
      {
          public void LogError(string message)
          { 
              Debug.WriteLine("Error: " + message);
          }
      }
  }

In my original Logger class, I create an instance of my new Logger. Each method in the original class now forwards requests to the new Logger instance. In this way, I am wrapping the new class in the original. This allows applications to still use the old class, though the functionality has been moved.

  public class Logger
  {
      LoggingUtilities.Logger _logger =
          new LoggingUtilities.Logger();
 
      [Obsolete("Use LoggingUtilities.Logger instead")]
      public void LogError(string message)
      {
          _logger.LogError(message);
      }
  }

As before we need to evaluate referencing projects. Because our original class still exists, these applications will continue to compile.

Note that I've added an "Obsolete" attribute to the LogError method. This means we will receive a compiler warning (or error) that we need to change our application to use the new class. This makes it clear what needs to be modified, saving time on any rework.

Sunday, October 18, 2009

Code can be both clean and efficient

Chapter 26 of Code Complete focuses on code tuning - the art of modifying code to improve performance. One example given is a switched loop:

  for (i = 0; i < count; i++)
  {
      if (sumType == SUMTYPE_NET)
      {
          netSum = netSum + amount[i];
      }
      else
      {
          grossSum = grossSum + amount[i];
      }
  }

Notice the 'if' statement inside the loop. If the array is rather large, this statement will be evaluate numerous times, despite the fact that the result will never change. The recommended solution is to unswitch the loop, so the 'if' statement is only evaluated once:

  if (sumType == SUMTYPE_NET)
  {
      for (i = 0; i < count; i++)
      {
          netSum = netSum + amount[i];
      }
  }
  else
  {
      for (i = 0; i < count; i++)
      {
          grossSum = grossSum + amount[i];
      }
  }

This recommendation was given with one warning: this code is harder to maintain. If the logic for the loops needs to change, you have to make sure to change both loops to match.

As with most coding tasks, there is more than one possible solution. In this case the ideal approach is to have both a single comparison and a single loop. If we throw one additional variable into the code, we can calculate the summation and then add it accordingly:

  for (i = 0; i < count; i++)
  {
      arraySum = arraySum + amount[i];
  }
 
  if (sumType == SUMTYPE_NET)
  {
      netSum = netSum + arraySum;
  }
  else
  {
      grossSum = grossSum + arraySum;
  }

Saturday, October 17, 2009

Export filtered Access data to Excel

In my free time I've been creating an MSAccess database containing a few data-entry forms. One of these forms allows the user to filter records based on several different criteria. This part was relatively straightforward. The difficulty was in trying to export the filtered information to an Excel spreadsheet. Although this functionality exists in Access, the installed help file was less than helpful. Forum posts seemed to contain partial solutions or solve something almost, but not quite what I was trying to do.

The following VBA subroutine is the eventual solution:

Private Sub Export_Click()
    Dim whereClause As String
    
    ' Generate our WHERE clause based on form values
    whereClause = GenerateFilterClause
    
    ' If we have no filter, export nothing
    If IsEmptyString(Nz(whereClause)) Then
        Exit Sub
    End If
    
    Dim query As String
    query = "SELECT DISTINCTROW Contacts.* " & _
            " FROM Contacts " & _
            " INNER JOIN Applications " & _
            " ON Contacts.ContactID = Applications.ContactID " & _
            " WHERE " & whereClause & ";"
    
    Dim filename As String
    filename = "c:\test.xls"

    ' Placeholder query already in the database
    Dim queryName As String
    queryName = "FilterExportQuery"

    ' Update the placeholder with the created query
    CurrentDb.QueryDefs(queryName).SQL = query

    ' Run the export
    DoCmd.TransferSpreadsheet acExport, acSpreadsheetTypeExcel9, queryName, filename
End Sub

Monday, October 12, 2009

Monitoring log files in real time

Debugging Windows services, especially in a test or production environment, can be tricky. In many cases you won't have access to the box. You certainly won't have the ability to step through the code.

Thus, you are usually forced to monitor log files, looking for an indication of where the problem occurred. The typical method is to start by opening the file in Notepad. Then, when you want to see more recent log entries, you close and reopen the file. This is mildly annoying when dealing with a single service. If your business workflow is split among multiple services, this becomes incredibly inefficient.

An easier solution is to use a log monitor app such as BareTail. For this little demo I am using the free version of the tool.

I have three separate services logging to files named "process1.log", "process2.log" and "process3.log." To keep it simple I am only logging the RequestID for each received request. Here I have loaded all three logs into BareTail.


When I send a new request to the system it should update each log file. BareTail monitors the logs and displays any updates. In the screenshot below, note the new Request ID #2918891. Note also that the document tabs for each file show a green arrow - this indicates an update was made.


As you view each tab, the green arrow will be cleared to visually show which files you have already reviewed.


Say you were trying to debug a request that fails to make it through the system. A quick glance at the document tabs will show you how far a request made it through the system. After reviewing each log (to clear the green markers) we submit another request. In the following screenshot, note that we have a green arrow for process1.log and process2.log, but none for process3.log. So either the second process failed to send the message on, or the third process failed to receive it.

Monday, September 21, 2009

Cleaning up enumerations

When working on existing code I occasionally run into an enumeration class similar to this:

  public class PowertoolsConstants
  {
      public enum Powertools
      {
          PowerDrill = 0, // Standard, corded drill
          Chainsaw,       // Everyone's favorite
          CircularSaw     // If the chainsaw is out of gas, use this
      }
 
      public static Powertools ConvertFromString(string s)
      {
          switch (s)
          {
              case "PowerDrill":
                  return Powertools.PowerDrill;
              case "0":
                  return Powertools.PowerDrill;
              case "Chainsaw":
                  return Powertools.Chainsaw;
              case "1":
                  return Powertools.Chainsaw;
              case "CircularSaw":
                  return Powertools.CircularSaw;
              case "2":
                  return Powertools.CircularSaw;
              default:
                  throw new Exception("Unknown Powertool");
          }
      }
 
      public static string ConvertFromPowertool(Powertools p)
      {
          switch (p)
          {
              case Powertools.Chainsaw:
                  return "Chainsaw";
              case Powertools.CircularSaw:
                  return "CircularSaw";
              case Powertools.PowerDrill:
                  return "PowerDrill";
              default:
                  return "Unknown";
          }
      }
  }


Nothing too complex, but it can be cleaned up a bit. For starters, accessing the enum currently requires referencing the class:

  PowertoolsConstants.Powertools tool =
      PowertoolsConstants.Powertools.Chainsaw;


If we move the enum declaration above the class we can remove the class reference:

  Powertools tool = Powertools.Chainsaw;


Next is addressing the two methods in the class: ConvertFromString and ConvertFromPowertool. The purpose of these methods is to switch between our enumeration and a string representation of the enum, perhaps to store values in an xml file or database. As the .Net Framework already contains this functionality, the methods are not necessary and can be deleted.

To convert from an enum value to a string we can use Enum.GetName

  string toolName = Enum.GetName(typeof(Powertools), tool);


To convert from a string to an enum value we can use Enum.Parse. Note that this will throw an ArgumentException if an invalid string is passed in.

  tool = (Powertools)Enum.Parse(typeof(Powertools), toolName);


With the two methods removed, the class PowertoolsConstants is empty and can be deleted.

One final thing to look at are the comments beside the enum values. These appear to be usage notes. If a developer using the enum needs to know this information, he shouldn't have to open this code to get it. The way to correct this is to replace the existing comments with xml-style comments.

  public enum Powertools
  {
      /// <summary>
      /// Standard, corded drill
      /// </summary>
      PowerDrill = 0,
 
      /// <summary>
      /// Everyone's favorite
      /// </summary>
      Chainsaw,
 
      /// <summary>
      /// If the chainsaw is out of gas, use this
      /// </summary>
      CircularSaw
  }


Doing this will provide the developer with Intellisense hints as they code:

Wednesday, August 19, 2009

Parameterized tests in NUnit

In an earlier post I showed how to pass parameters to test methods using an NUnit RowTest extension. As of version 2.5, the extensions are no longer packaged with the NUnit installer. The good news is that the addition of parameterized tests replaces the RowTest and adds a number of new features as well.

For reference, my previous RowTest looked like this:

[RowTest]
[Row(2, 3)]
[Row(-1, -4)]
public void AddTwoNumbers(int x, int y)
{
    Assert.AreEqual(x + y, Add(x, y),
        "Add returned incorrect result");
}

A basic switch to a parameterized test is a matter of dropping the RowTest attribute and replacing each Row attribute with a similarly-formatted TestCase attribute. The new code, which creates two distinct tests as before, looks like this:

[TestCase(2, 3)]
[TestCase(-1, -4)]
public void AddTwoNumbers(int x, int y)
{
    Assert.AreEqual(x + y, Add(x, y),
        "Add returned incorrect result");
}

In addition to single parameters you can now specify ranges. If I want to test values of X from 1 to 5, with a Y value of 1, I can do so using the Range and Values attributes, like so:

[Test]
public void AddTwoNumbers(
                    [Range(1, 5)]int x,
                    [Values(1)]int y)
{
    Assert.AreEqual(x + y, Add(x, y),
        "Add returned incorrect result");
}        

In the test runner, this shows up as five distinct unit tests


If I specify the range 1-5 for both X and Y, NUnit defaults to creating 25 unique tests. This is the default Combinatorial attribute.


If I wish to use a value from each range only once, I instead mark the test as Sequential

[Test, Sequential]
public void AddTwoNumbers(
                    [Range(1, 5)]int x,
                    [Range(1, 5)]int y)
{
    Assert.AreEqual(x + y, Add(x, y),
        "Add returned incorrect result");
}        

which produces the desired effect

Wednesday, August 12, 2009

Save WinForm control values between executions

Say I have a test application that submits info to a webservice. Because this webservice has a few issues, I may need to retry a request several times to get a valid response. I've added a control to set the number of retries.


Specifying the control's Value property at design-time sets the starting value at runtime. If a user wants to set a different value, he must do so each time he starts the app. To make things more user-friendly it would be better to save the control's value between executions.

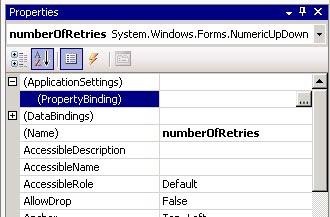
To do so, start by selecting the desired control in the designer. In the Properties window, expand the ApplicationSettings entry and select the ellipsis (...) for the PropertyBinding sub-entry.


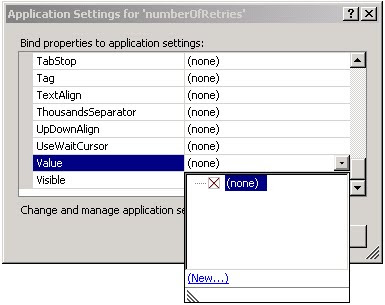
In the Application Settings dialog that appears, select the dropdown next to the 'Value' entry, as this is the property we wish to persist.


Select the '(New...)' link from the popup, which brings up the New Application Setting dialog.


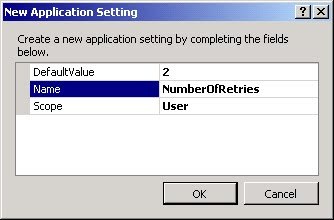
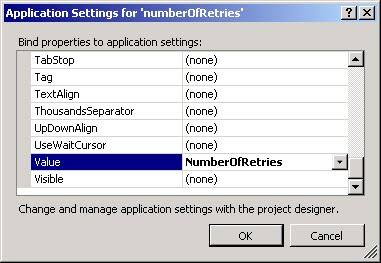
Specify the default value and name of the config setting (and modify the Scope if necessary) and press OK. This will update the Application Settings dialog to show the newly added entry.


Press OK to close the dialog. With the property binding set, the application will automatically load the value at startup. The only thing left is to save the modified value. In the form's FormClosing event handler, add the following line:

Properties.Settings.Default.Save();


At this point the change is ready to test. Start the application and modify the control's value. Without doing anything else, close the application. Now restart the app. Note the control contains the modified value.

It would seem the desired functionality is complete but there is one more item that needs to address. If you look for the saved settings file, you will find it under

C:\Documents and Settings\<username>\Local Settings\Application Data\<Company>\<AppName>\<version>

If the version number for the application is changed, the previously saved setting won't be loaded. The application needs to know to upgrade the saved settings the first time it runs.

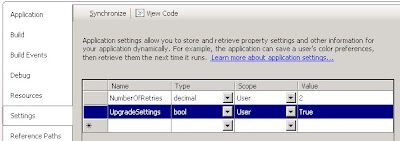
Start by adding a new application setting called UpgradeSettings. This will be used to make sure we only upgrade the settings once. Otherwise, any newly saved settings will be replaced by the previous version's settings every time the app starts.


The final step is to add the upgrade logic to Program.cs. In the Main method, add the following code immediately before the call to Application.Run.

if (Convert.ToBoolean(Properties.Settings.Default["UpgradeSettings"]))
{
    Properties.Settings.Default.Upgrade();
    Properties.Settings.Default["UpgradeSettings"] = false;
}

Tuesday, July 14, 2009

No-hassle SQL connection strings

Most applications working with a database handle the connection string in one of two ways: Hard-coding the full string or doing some amount of string concatenation. A typical concatenation method looks something like this:

public string OldMethod(string server, string database,
                        string username, string password)
{
    string connectionString = "Data Source=" + server + ";";
    connectionString += "Initial Catalog=" + database + ";";
    connectionString += "User ID=" + username + ";";
    connectionString += "Password=" + password;
 
    return connectionString;
}

I admit this is fairly simple code. The only potential issues might be a property name typo or a misplaced (or missing) semicolon. But why hassle with even that much when the dotNet Framework has the same functionality built into the SqlConnectionStringBuilder class? With a reference to System.Data.SqlClient, the above method can be replaced with:

public string NewMethod(string server, string database,
                        string username, string password)
{
    SqlConnectionStringBuilder connBuilder 
        = new SqlConnectionStringBuilder();
 
    connBuilder.UserID = username;
    connBuilder.Password = password;
    connBuilder.InitialCatalog = database;
    connBuilder.DataSource = server;
 
    return connBuilder.ToString();
}

In either case, the output is identical:

Data Source=myServer;Initial Catalog=myDatabase;User ID=myUser;Password=myPassword

Note: If you are working with a database other than MSSQL, there are several other classes derived from the common DbConnectionStringBuilder base class, such as OdbcConnectionStringBuilder and OracleConnectionStringBuilder.

Monday, July 6, 2009

Quickly escape strings in xml

If you spend much time working with xml, you will find yourself needing to escape strings. Replacing '<' with '&lt;' for example. Usually the code written to do so looks something like this:

escapedItem = itemToEscape.Replace("&", "&amp;")
                          .Replace("<", "&lt;")
                          .Replace(">", "&gt;")
                          .Replace("'", "&apos;")
                          .Replace("\"", "&quot;");

Though this technically works, there is an easier way built right in to the .Net framework. If we reference System.Security we can replace the above code with

escapedItem = SecurityElement.Escape(itemToEscape);

In both cases, the string

If (x < 2) & (y > 3), where \"x\" isn't...

is replaced with

If (x &lt; 2) &amp; (y &gt; 3), where &quot;x&quot; isn&apos;t...

Tuesday, May 19, 2009

An easier way to manage CruiseControl.Net projects

In a much older post I showed a quick way to remove duplication in a CruiseControl.Net (CCNet) config file. Since then, CCNet has added a Configuration Preprocessor to not only simplify this process, but also split the ccnet.config into multiple files - one per project.

To start with, we need to modify ccnet.config to specify the correct xml namespace:

<cruisecontrol xmlns:cb="urn:ccnet.config.builder">

Now we move an existing project from ccnet.config into a separate file. Note this new file starts with 'project' as the root node, and must also have the correct xml namespace.

<project xmlns:cb="urn:ccnet.config.builder">
    <name>My Test Project</name>
    <triggers>
        <intervalTrigger seconds="60" />
    </triggers>
    <sourcecontrol type="svn">
        <executable>svn.exe</executable>
        <trunkUrl>svn://MySourceServer/myAppPath</trunkUrl>
        <workingDirectory>C:\CCNetProjects\MyTestProject</workingDirectory>
        <username>svnUser</username>
        <password>svnPassword</password>
        <autoGetSource>true</autoGetSource>
    </sourcecontrol>
    <tasks>
        <msbuild>
            <logger>c:\ThoughtWorks.CruiseControl.MSBuild.dll</logger>
            <projectFile>MyTestProject.sln</projectFile>
            <buildArgs>/noconsolelogger</buildArgs>
            <targets>Build</targets>
            <workingDirectory>D:\CCNetProjects\MyTestProject</workingDirectory>
        </msbuild>
    </tasks>
    <publishers>
        <statistics/>
        <xmllogger/>
        <artifactcleanup cleanUpMethod="KeepLastXBuilds" cleanUpValue="25" />
    </publishers>
</project>

In the main ccnet.config, our project information can be replaced with an include that points to our new project config:

<cb:include href="C:\MyTestApp.ccnet.config" />

Instead of one massive config file, we now split it by project. This makes adding, removing, or modifying projects much easier. As an added bonus, CCNet monitors the project-specific config files and reloads them if anything changes.

I mentioned that we can also use the preprocessor to reduce duplication. In the project config above, note the Subversion username and password nodes:

<username>svnUser</username>
<password>svnPassword</password>

If we define these values in each individual config, changing them requires a find/replace across multiple files. What we want to do is define them once in the main ccnet.config and then include them in our project configs. To do this, we start by adding the following to ccnet.config

<cb:define name="svnCredentials">
    <username>svnUser</username>
    <password>svnPasswrod</password>
</cb:define>

In our project config we can replace the two credential nodes with a single reference to 'svnCredentials'. If we ever change the account our buildserver uses to pull code, we only need to change the credentials once.

<sourcecontrol type="svn">
    <executable>svn.exe</executable>
    <trunkUrl>svn://MySourceServer/myAppPath</trunkUrl>
    <workingDirectory>C:\CCNetProjects\MyTestProject</workingDirectory>
    <cb:svnCredentials/>
    <autoGetSource>true</autoGetSource>
</sourcecontrol>

Monday, April 6, 2009

Mmc load failure

After running our legacy installer we ran into yet another problem - the Computer Management administrative app quit working. Attempting to start it gave an error stating:

MMC cannot open the file C:\WINDOWS\system32\compmgmt.msc.

This may be because the file does not exist, is not an MMC console, or was created by a later version of MMC. This may also be because you do not have sufficient access rights to the file.


To debug this particular issue, we turn to Process Monitor. When we start up the app, the first item shown is a filter dialog. For this session, we need to add mmc.exe to the list of processes to monitor.


Though it's useful to see all activity for a given process, we are generally focused on errors. To make this easier, we want to highlight any log entries that do not have a Result of 'SUCCESS'


Once we have Process Monitor configured and running, we can start the Computer Management tool. The logs will quickly fill up with registry and filesystem events, many of which will be highlighted


In the above screenshot, notice the registry ReadOpenKey failures for various items under "HKCR\CLSID\{2933BF90-7B36-11d2-B20E-00C04F983E60}". I don't know off hand what those sub-items specify, but without them I do know you will be unable to load the associated COM object. To determine what dll was at fault, we went to another computer and looked for that section in the registry.


Note above the default value of "C:\WINDOWS\system32\msxml3.dll." For whatever reason, our installer was unregistering this system dll - definitely not a good thing. Fixing the problem on the broken box was as simple as running regsvr32 on msxml3.dll.

Friday, March 27, 2009

Runtime profiling a COM registration failure

As a continuation of my last post, we had another registration error with the same legacy installer. This time the problem was with mssoap30.dll. Loading the dll in Dependency Walker revealed a single error with dwmapi.dll.


With a bit of web searching we found that dwmapi.dll is only present on Vista and later machines. Since we weren't using that dll directly it shouldn't be the cause of our issue on Windows XP.

At this point it would appear we have all necessary dlls and that our problem must be elsewhere. The documentation on Dependency Walker, however, provides some useful information:

When a module is first opened by Dependency Walker, it is immediately scanned for all implicit, delay-load, and forwarded dependencies. Once all the modules have been scanned, the results are displayed. In addition to these known dependencies, modules are free to load other modules at run-time without any prior warning to the operating system. These types of dependencies are known as dynamic or explicit dependencies. There is really no way to detect dynamic dependencies without actually running the application and watching it to see what modules it loads at run-time.

Version 2.0 and later of Dependency Walker provides a Profile option from the menu. If you have a dll loaded, however, the item is disabled - you have to load an executable first.


For this to work, you need to load regsvr32.exe, which will enable the menu items. Once done, select Profile > Start Profiling to bring up the Profile Module dialog. The only necessary change is to add the dll being registered to the "Program arguments" setting.


Press OK and wait for the application to run. Eventually you will see the usual registration error message box, which you can simply click to continue. Once finished, scrolling through the results shows a couple errors for mssoapr3.dll.


The first error states that the file path specified can't be found. Double-clicking the error shows that it is looking for the dll under "c:\temp\1033". The second states that it cannot find the file - this time in the same folder as the dll we tried to register. So it seems either location is valid for this particular dependency.

Once we add mssoapr3.dll to the same folder, mssoap30.dll registers without issue.

Tuesday, March 24, 2009

COM dll registration failure

Every shop has at least one legacy piece of software they have to support. Written in VB6. With lots of copy/paste code and sections that may or may not still be active. By a developer long since gone from the company. It's bad enough to have to deal with the code itself, but try and rebuild the equally-convoluted installer and you might just go mad.

Our problem wasn't in rebuilding the installer, per-se, but in getting it to run successfully afterward. One issue we ran into were COM dlls that failed to self register.


When we attempted to run regsvr32 on this particular dll, we were given an error dialog stating:

LoadLibrary("C:\WINDOWS\system32\pcmcom.dll") failed - The specified module could not be found.

This particular issue is often due to a missing dependency. To verify this we opened up Dependency Walker and loaded pcmcom.dll. In the screenshot below, you can see the yellow question mark symbol next to pcm.dll - our missing dependency. Once we found pcm.dll and its dependencies, pcmcom.dll registered without issue.

Friday, March 20, 2009

Subversion revision corruption

Say that three times fast...

We ran into an interesting issue earlier this week with Subversion. When attempting to perform any sort of operation on one of our repositories, the operation failed with an error stating "Final line in revision file longer than 64 characters svn: PROPFIND of '/svn/myRepository/myProject'."

When a checkin is made to Subversion, the file differences are compressed and saved to disk under \myRepository\db\revs\. Each checkin will be in a separate file named to match the revision number. Thus revision 1200 is saved to a file named "1200" (no extension.) If you open one of these files in a text editor, you will mostly see unreadable binary. One noticeable feature in all of the files is a pair of numbers on the last line - "10550 10745" perhaps. In our particular case the final revision contained two additional lines following the number pair:

100.1.1.10 - myUser [16/Mar/2009:10:12:06 -0500] "PROPFIND /svn/myRepository/!svn/bln/2914 HTTP/1.1" 207 464
100.1.1.10 - myUser [16/Mar/2009:10:12:06 -0500] "PROPFIND /svn/myRepository/myProject HTTP/1.1" 207 714


These lines are normally found in the Apache log file - not a good sign. A web search verified that it is a known issue with no resolution. The good news is that the page links to a Python script that attempts to repair corrupt revisions. (More information on using the script can be found here.)

The bad news? The script didn't entirely work for us - some of the header info on the compressed diffs had been lost. Fortunately, it did remove the Apache log info from the tail of the file, so other developers could again work. The only section now corrupt was the project where the revision error occurred. This project started returning an error stating "Checksum mismatch while reading representation."

With the issue isolated, the next step was to remove the corrupt revision. Unfortunately, the only way to do that in Subversion is to export the good revisions and then build a new repository using those exports. Say revision 120 is bad and we have a total of 150 revisions. We start by dumping revisions 1 through 119 to a file:

svnadmin dump c:\myRepository\ -r1:119 > c:\DumpPart1.dmp

We then need an incremental dump for changes 121 through 150:

svnadmin dump c:\myRepository\ -r121:150 -- incremental > c:\DumpPart2.dmp

Rename the folder "myRepository" to something else as a quick backup, then create a new database:

svnadmin create c:\myRepository

Copy any config files from the backup repository (such as user accounts) then load the dumps into the new database:

svnadmin load c:\myRepository < c:\DumpPart1.dmp
svnadmin load c:\myRepository < c:\DumpPart2.dmp


One item of note: Loading a Subversion dump effectively creates new checkins for each item in that dump. All items in the second dump above will have a revision number one lower than previously - checkin 121 in the old database becomes checkin 120 in the new database. Though I've not seen it, some developers may receive an error if their local code contains a newer revision number than the database. As I ran a few test checkins after creating the new database, this wasn't a problem.