Friday, December 28, 2007

Treat Warnings as Errors

In a previous post I mentioned the importance of fixing compiler warnings. I forgot about a useful project setting in Visual Studio that will cause all build warnings to display as errors instead. From the project's properties page, select the Build tab. Under "Treat warnings as errors," set the value to "All." While this may be difficult to justify on existing projects with hundreds of warnings, this is something that should be set on all new projects.


Tuesday, November 6, 2007

Quick and dirty debugging - DebugView and Trace.WriteLine

Here's another debug scenario for you. After taking great effort in testing your application you hand it off to QA. They throw it back with some interesting bug. Using the exact same steps, you're unable to reproduce on your machine. You have a general idea of where the app is failing, but can't be sure precisely what the issue is.

At this point one usually resorts to some sort of logging. These logging statements are placed in strategic locations through the suspect code (at every other line.) If the bug is in the UI, the common method is MessageBox.Show. If the problem is in an underlying assembly, you must resort to writing output to a text file. The downside is that lots of message boxes wear you out, and it's always a pain tracking down the necessary code to write files.

An easier option is to call Trace.WriteLine (located in System.Diagnostics.) In my sample application (MyApp) I have a single button. Inside the Click event, I add the following line

 Trace.WriteLine("Button1 was clicked");

The event then calls a method in a separate library. In this library method, I've added the following line ('x' was the parameter passed into the method)

 Trace.WriteLine("SomeMethod - Parameter x: " + x.ToString());

When I run the application from VisualStudio and click the button, the Output window contains the trace messages


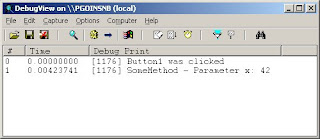
That's fine if you're running VS, but what about on a QA box? For that I'm using DebugView. After starting up the utility, I fire up the sample application. Click the button (which again calls Trace.Writeline) and DebugView displays the messages previously seen in Visual Studio.

Invalid Data Source crashes Visual Studio

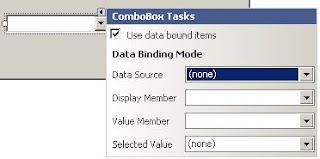
Binding data object to a WinForms control is usually straightforward. Say you have a ComboBox control. Clicking the triangle on the top-right will display the ComboBox Tasks dialog.


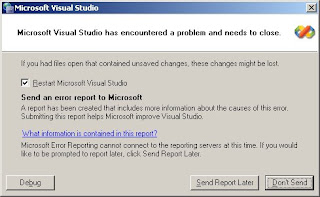
Once you check the box to "Use data bound items" you start by selecting the Data Source. Normally, clicking the Data Source dropdown provides you with a list of existing items, as well as the option to create a new one. A few days ago we ran into an issue where, instead of the datasources list, we were given this rather entertaining dialog


With a few hints from the blogging community, we were directed to the Data Sources window (Data > Show Data Sources, or Shift+Alt+D.)


Notice the first entry has an error icon. This is due to a datasource pointing to a non-existent class. Right-click the invalid entry and choose Remove Object. Now the Data Source dropdown behaves as expected.

Thursday, November 1, 2007

Debugging with the Fusion logger

If you've spent much time developing, you've probably run into this scenario. You're working along coding a new application. Everything runs on your machine. Then you hand it off to someone to test (that, or load it on the production server - let the users tell you what's wrong.) Unfortunately, the app crashes as soon as you attempt to start it. Looking in the Event Logs, you see generic .Net errors, but nothing that appears to help. Short of installing VisualStudio on the box in question, how do you track down the issue?

One place to start is the Fusion logs. For this demo, I've created a class library (MyClassLib) and a command-line app (MyConsoleApp.) The app makes a single method call into the library and then exits. Nothing interesting to see when everything works. If I delete MyClassLib.dll and run the application, I witness a rather unpleasant dialog


When an app closes in a violent manner, the first place to look is the computer's event logs. Unfortunately, the only entry for the app looks something like:

"Faulting application myconsoleapp.exe, version 1.0.0.0, stamp 47293d14, faulting module kernel32.dll, version 5.1.2600.3119, stamp 46239bd5, debug? 0, fault address 0x00012a5b."

So now we turn to the Fusion logs. The first step is to copy the Assembly Binding Log Viewer (fuslogvw.exe) from any machine with VS2005. Start it up; it looks something like this:


Click on the Settings button. In the dialog, select "Log bind failures to disk." Check the box to "Enable custom log path" and specify an already-existing folder (the app won't create it for you.)


Note: According to official documentation, you should be able to use the default log directory. In my experience, that never seemed to work.

With the logger set up I again attempt to run the application. Which again crashes. Going back to the Fusion log viewer, click Refresh. I now have a single entry


Clicking on the entry loads the details in Internet Explorer (shown below.) If you look halfway down the log, you'll see the reference to MyClassLib. Near the end, you'll see the various locations it searched for the file. Now it's a simple matter of finding a copy of my dll and placing in the search path.


*** Assembly Binder Log Entry (10/31/2007 @ 10:14:45 PM) ***

The operation failed.
Bind result: hr = 0x80070002. The system cannot find the file specified.

Assembly manager loaded from: C:\WINDOWS\Microsoft.NET\Framework\v2.0.50727\mscorwks.dll
Running under executable C:\temp\testcode\MyConsoleApp\bin\Release\MyConsoleApp.exe
--- A detailed error log follows.

=== Pre-bind state information ===
LOG: User = SH\pgoins
LOG: DisplayName = MyClassLib, Version=1.0.0.0, Culture=neutral, PublicKeyToken=null
(Fully-specified)
LOG: Appbase = file:///C:/temp/testcode/MyConsoleApp/bin/Release/
LOG: Initial PrivatePath = NULL
LOG: Dynamic Base = NULL
LOG: Cache Base = NULL
LOG: AppName = MyConsoleApp.exe
Calling assembly : MyConsoleApp, Version=1.0.0.0, Culture=neutral, PublicKeyToken=null.
===
LOG: This bind starts in default load context.
LOG: No application configuration file found.
LOG: Using machine configuration file from C:\WINDOWS\Microsoft.NET\Framework\v2.0.50727\config\machine.config.
LOG: Policy not being applied to reference at this time (private, custom, partial, or location-based assembly bind).
LOG: Attempting download of new URL file:///C:/temp/testcode/MyConsoleApp/bin/Release/MyClassLib.DLL.
LOG: Attempting download of new URL file:///C:/temp/testcode/MyConsoleApp/bin/Release/MyClassLib/MyClassLib.DLL.
LOG: Attempting download of new URL file:///C:/temp/testcode/MyConsoleApp/bin/Release/MyClassLib.EXE.
LOG: Attempting download of new URL file:///C:/temp/testcode/MyConsoleApp/bin/Release/MyClassLib/MyClassLib.EXE.

LOG: All probing URLs attempted and failed.

Friday, October 19, 2007

Implicit conversions

I'm working on a project where request and response messages are serialized before sending across the wire. We do this by calling an override of ToString(). So a line in the code might look like
    response = myProvider.ProcessMessage(myMessage.ToString());

If I try to type
    response = myProvider.ProcessMessage(myMessage);

I get a build error stating that it cannot implicitly convert type 'SomeCoolMessage' to 'string.' So, what if I want to implicitly convert between the two? In the SomeCoolMessage class I add a new operator

    public static implicit operator string(SomeCoolMessage m)
{
return m.ToString();
}

Now I can write
    response = myProvider.ProcessMessage(myMessage);

and everything just works.

Friday, October 5, 2007

Lessons learned

My current project is nearing completion of Phase 1. Along the way, I've compiled a list of observations, lessons learned, etc, some of which I've already blogged. Here are a few more:

1) When possible, use project references instead of file references. It may seem convenient to break up the code into smaller solutions and use file references across solutions. Problems arise when you have one master solution that builds all of the projects - you must explicitly set the build order. With project references, VisualStudio determines the proper order for you, meaning less maintenance. Also, when you right-click on a method/class/whatever and choose "Go To Definition," file references will take you to a page of metadata instead of the actual code.

2) Refactor often, and sooner rather than later. Say you're working on set of classes that use a common interface. You then decide to build a base class from that interface, and derive the other classes from the base. Don't leave old classes as-is and use the base only for new classes. One issue is you potentially leave bugs that the base was specifically designed to address. Another is that when a new team member joins the project, he will likely use existing code as a template for adding new functionality. If he sees the non-base-derived class and builds his own directly from the interface, refactoring later becomes more difficult.

3) Remove dead code. When you replace one method with another, delete the old method. When functionality is no longer required, delete that functionality. Don't leave it in. Don't comment it out. If you need that code later, pull it from your source repository. As the source grows in size, you'll have enough to deal with without adding the extra hassle associated with dead code.

4) Obsolete code if you can't currently delete it. Say you replace a method with another, but you can't replace all of the method calls at the moment (this especially happens with public methods.) Mark the method as obsolete and note the proper method to use instead. In C# this looks like [Obsolete("Use method foo instead")].

5) When changing the database schema, change the data access code at the same time. Until these two are in sync, your code doesn't work. You should have failing unit tests to flag the issues, but that's not always the case. In that instance, your first indication that there is a mismatch is when a developer attempts to run code that he thought was working. Often, the developer attempts to track down the problem, which another dev already knew about. All of which leads to wasted time.

6) Reduce confusion within the code. Maybe there's a method being incorrectly called, or called when another should have been used instead. It's not enough to correct the developer. Look at why the error occurred. Perhaps better comments on the method would help (use xml comments to populate intellisense.) Or perhaps the method could be named better. The problem may also be due to poorly architected code in need of refactoring. Bottom line: fix the issue instead of addressing symptoms.

7) If you can't unit test the entire codebase, write tests for the error-prone code. Ideally you want 100% code coverage from your unit tests. In reality this isn't going to happen. Therefore, focus unit tests on problematic and/or complex areas of code. We have lots of code binding to dataset columns. These columns are taken directly from the database. If a column was dropped from the table, you won't receive a compiler error on row["DroppedColumn"] but you will receive a runtime exception. These issues need to be caught by the unit tests, not the QA team.

8) Code generation must be handled very carefully. Most see code generation as an easy way to save time on a project. This is especially true for database access code - basic CRUD operations don't change from one table to the next. Once you have the first generation complete, how you proceed becomes critical. Say you spend a few weeks writing code that uses the autogen code. Someone then decides to make changes to the templates and regen everything. While the intent may have been valid, this regen quite likely broke existing code. At a minimum, your unit tests fail and you can easily find and fix all of the problems. But even then, time must be spent on the fix. If you don't have a decent set of unit tests - be prepared for the increase in tickets from QA. Unless your autogen code is truly separate from the rest of the project, it's probably better in the long run to gen once and modify by hand after that.

Monday, September 24, 2007

Hidden Desktops and NUnitForms

In my last post I noted a problem working with NUnitForms. I was unable to get the hidden desktop to work with a [SetUp] method. After digging through the source code, I have my solution.

The code that sets up the hidden desktop is in the method init(). This method is marked with the [SetUp] attribute. When I created my own method with this attribute, init() was no longer being called. Thus, no hidden desktop.

The solution is to override the Setup() method provided in NUnitFormsTest, but to not mark it with the [SetUp] attribute. The last thing init() does before exiting is make a call to Setup(). The TearDown attribute and method have a similar implementation.

When the documentation seems to be lacking, it's always nice to have the source code.

Friday, September 21, 2007

WinForms testing using NUnitForms

I've been spending a lot of time lately coding screens for a WinForms application. Although I've written unit tests for the server components, the client side is somewhat lacking. Each time I change a screen I have to manually test those changes and verify I didn't break anything. In an attempt at automating the process, I've started looking at NUnitForms, an extension to NUnit.

Setup

1) Install NUnitForms
2) Create a project for your NUnit tests. Configure NUnit as normal.
3) Add references to your application project, NUnitForms, System.Windows.Forms, and any third-party controls you use on your application's forms.
4) In the test fixtures, add 'using NUnit.Extensions.Forms'

Basic forms testing

Let's say my application under test (AUT) contains a form, Form1. The first step is to create and display an instance of that form


Form1 testForm = new Form1();
testForm.Show();

Say the form has a button - btnOne. Pressing the button programatically looks like this


ButtonTester btnOneTester = new ButtonTester("btnOne");
btnOneTester.Click();

Upon clicking this button, a label was updated with the everyone's favorite power tool. To verify


LabelTester labelOneTester = new LabelTester("labelOne");
Assert.AreEqual("Chainsaw", labelOneTester.Text, "Label text doesn't match expected");

Though it's not required, it's probably a good idea to close the form instead of letting it fall out of scope


testForm.Close();

Using the hidden desktop

Running these tests on your local machine doesn't pose any issues. If you run them on a build server, however, you'll likely find that they fail - there's no window for the forms to be displayed in. Fortunately, you can send them to a hidden desktop.

To do so, your test fixture must inherit from NUnitFormTest. Then, add the following property to the class


public override bool UseHidden
{
get { return true; }
}

One warning - In most of my test fixtures, I tend to put common code in a [Setup] method. I'm finding that when I have this defined, forms are not being sent to the hidden desktop. I've not spent much time on it, so I'm not sure if it's something I'm doing wrong, or if it's a bug in the tool. I'll post more info if/when I figure it out.

Sunday, September 16, 2007

Silverlight preparation

A friend recently decided to start a monthly Hack Day for a small group of colleagues. Given that it's often difficult to motivate oneself to study new technology, the idea is to gather like-minded slackers and force each other to do a little research.

After some discussion, we decided on Silverlight as the first topic. Here's what I did in preparation:

1) Downloaded a VPC image of Orcas (aka VS2008.) You have to download a base image along with the Orcas image - nearly 14GB total.

2) Installed various 1.0 and 1.1 packages:

Silverlight 1.0 Runtime
Silverlight 1.0 SDK
Silverlight 1.1 Alpha Refresh
Silverlight Tools for VS2008
Expression Blend 2 August Preview

3) Watched the Getting Started video and a few Blend tutorials

Uncompressed images and file sizes

Scanning paper documents can be a useful way to transfer and store data. This of course assumes you are scanning bitonal, with some form of image compression. If you were to scan in 24-bit color with no compression, you'd find the output less than useful.

To see this, let's start with a 1 inch square, at 10 dots per inch (dpi.) The total number of dots (pixels) is 10x10, or 100. If we create a larger square, say 5 inches on each side, we now have 25 square inches. At 10dpi, that's 2500 pixels (100 dots per square x 25 squares.) If we scanned a normal sheet of paper (8.5x11) we have a total of 93500 pixels.

Going back to the 1 inch square, say we double the dpi to 20. What does that do to the pixel count? You might initially say it doubles. If you calculate it, however, you find that you quadrupled the number (20x20 = 400.)

The total number of pixels can be found using the formula:

(horizontal dpi * image width in inches) * (vertical dpi * image height in inches) = total pixels

A normal sheet of paper, scanned at 100dpi

(100 * 8.5) * (100 * 11) = 935,000 pixels

The other item to consider is the bit depth of the image. For a bitonal image, each pixel is represented by 1 bit (black or white.) Color images, such as photos, are saved with RGB values for each pixel. This typically requires one byte per color, or three bytes per pixel

To calculate the total number of bytes per image:

total pixels * bytes per pixel = total bytes

A normal sheet of paper, again at 100dpi, scanned in 1 bit-per-pixel (bpp)

935000 * 0.125 = 116,875 bytes

That same page, scanned in 24bpp

935000 * 3 = 2,805,000 bytes (~2.5MB)

As you can see, scanning in full color without compression creates much larger images. Again with 24bit color, here are some common scanner dpi's with their resulting image sizes (in bytes.)


200 dpi = (200 * 8.5) * (200 * 11) * 3 = 11,220,000

300 dpi = (300 * 8.5) * (300 * 11) * 3 = 25,245,000

600 dpi = (600 * 8.5) * (600 * 11) * 3 = 100,980,000

Tuesday, September 4, 2007

Upgrading from NUnit 2.2 to 2.4

Until recently, I was running NUnit 2.2.9 on both my work and home computers. This weekend I decided to upgrade my home computer to version 2.4.3. The quick and painless process went as follows:

1) Uninstall v2.2.9
2) Install v2.4.3
3) Open an existing project containing unit tests
4) Updating the references to point to the new assemblies
5) Compile and run...

Well, it all worked except for that last step. At one point, I seem to recall NUnit requiring you to reference nunit.core. Whatever that reason, it's no longer a requirement, and was the cause of the build failure. After removing the reference, everything ran as before.

Constraint-based assertions

One of the most noticeable changes in version 2.4 was the inclusion of constraint-based assertions, similar to some of the mock frameworks available. Previously, you might write assertions like:

Assert.IsTrue(age < 21);
Assert.AreEqual(9, age);

Using constraints, you can now write:

Assert.That(age, Is.LessThan(21));
Assert.That(age, Is.EqualTo(9));

Also, if your test fixture is derived from AssertionHelper, you can shorten the previous lines to:

Expect(age, LessThan(21));
Expect(age, EqualTo(9));

Note: you will need to add using statements for NUnit.Framework.Constraints and NUnit.Framework.SyntaxHelpers. For more examples, including comparisons to the older Assert methods, look for AssertSyntaxTests.cs under the NUnit install directory.

Thursday, August 16, 2007

Custom Code Snippets

I'm not exactly sure when snippets were added to VisualStudio. I'm also not sure why I neglected them this long. I guess I just wasn't one of the Cool Kids. Hopefully I can make amends.

In case you are unfamiliar with snippets, this is the feature that lets you type 'prop' inside a class definition, press 'Tab' twice, and end up with a complete property definition. Even better, it highlights the items to modify, and you can easily Tab between them as you edit.


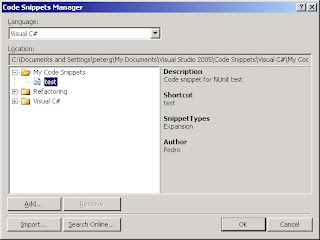
This is cool. Knowing this is there and using the built-in snippets, however, doesn't make one cool. True coolness occurs when one creates one's own. My journey began with an existing .snippet file. The path to these can be found in the Code Snippet Manager (under the Tools menu.) A few changes and I had the following:


<?xml version="1.0" encoding="utf-8" ?>
<CodeSnippets xmlns="http://schemas.microsoft.com/VisualStudio/2005/CodeSnippet">
<CodeSnippet Format="1.0.0">
<Header>
<Title>test</Title>
<Shortcut>test</Shortcut>
<Description>Code snippet for NUnit test</Description>
<Author>Pedro</Author>
<SnippetTypes>
<SnippetType>Expansion</SnippetType>
</SnippetTypes>
</Header>
<Snippet>
<Declarations>
<Literal>
<ID>testName</ID>
<ToolTip>Test name</ToolTip>
<Default>myUnitTest</Default>
</Literal>
</Declarations>
<Code Language="csharp">
<![CDATA[[Test]
public void $testName$()
{
Assert.Fail("TODO: Implement test");$end$
}]]>
</Code>
</Snippet>
</CodeSnippet>
</CodeSnippets>


For those following along at home, save the above as a .snippet file. This can either be placed with the existing snippets, or in the "My Code Snippets" folder buried under "My Documents." Once saved, the Snippet Manager should list the new file.


To try it out, open up a .cs file containing unit tests. In a blank area between existing tests, type 'test' and press 'Tab' twice. Assuming I didn't screw up the above xml, you should now have the start of a new unit test.

Wednesday, July 25, 2007

Compiler warnings are a Bad Thing

Most projects I've worked on contained a sizeable number of compiler warnings. These are usually ignored by developers as being unimportant. So there are a few (dozen) variables defined that are never used - so what? Duplicate 'using' statements - that can't hurt anything...

It's true that some warnings are mostly harmless. The problem is that these warnings often hide other, more important ones. A few serious ones that come to mind:

- Unreachable code. Perhaps there's a return statement halfway through a function. Or a conditional that will always evaluate true (or false.) These often have unintended side effects.

- A variable is never assigned to, and will always have a default value. You've created a variable, foo, that you're using in your code, perhaps in a method call or conditional. The problem is, you never set foo to anything. It's possible the variable should be removed or replaced with a constant. But it's also possible you forgot to retrieve or calculate something.

- A class member hides an inherited member. Maybe you intended to replace it with your own. In that case, use 'new' to explicitly document the desired effect. If hiding was unintentional, you're better off renaming the member. Otherwise, you may later decide you need that hidden item. At which point you end up with a bit of code rework.

Tuesday, July 24, 2007

Single responsibility builds

When I joined my current project, the CI build server (CC.Net) was already in place. For the most part, things were in working order. One item I took exception to was the fact that every build copied files to the development server. The idea being that a developer can run tests to verify that all of the pieces are working correctly. For most of the team, however, this is instead used as a convenient way to code the UI without running the services locally. This makes sense.

The problem, however, comes in when a significant change is made to that code (as in the recent data access changes.) Much of the code still has bugs to work out, despite the fact that the code compiles. The way the build is set up, the copies to the server happen after the compile, regardless of the unit test results. The end result is that after the change, developers could no longer test against the server's build.

Ideally, the continuous build process would not touch the dev server files. Instead, a separate build is created to copy the files on demand (using a Force Build in CC.Net.) When the build is in a faulty state, UI developers can continue working off a known-good base, while others can iron out the bugs in the server code. Another option would be to fail the build if any unit tests fail, so the file copies aren't carried out. Of course, this assumes the tests normally pass.

Monday, July 23, 2007

Always address failing unit tests

I cannot stress enough the value of unit tests. Whether adding new features or refactoring existing code, you want some validation that you haven't broken existing functionality. Unit tests are usually the fastest way to accomplish this.

This is why it annoys me when unit tests are left in a failing state. In some cases, the tests are invalid and need to be removed. In other cases, they need to be updated to match code changes. Regardless of why a test now fails, it needs to be corrected.

On a project I'm currently involved in, there was a significant rework of data access code. As you can imagine, this introduced a number of bugs, many of which were caught by now-failing unit tests. This is a good thing - that's what the unit tests are for. The problem is that the 50 newly-failing unit tests are mixed in with the 40 already-failing unit tests. We need the new failures fixed quickly, but sorting these from the "junk" unit tests will take time.

Tuesday, July 17, 2007

Debugging with Exception Breakpoints

How many times has this happened to you? You're working on code that's not quite functioning correctly. You suspect there's an exception being thrown somewhere, but it's being caught and ignored. Maybe this was intentional, or maybe it was poorly written code. Either way, you need to locate the problem. Visual Studio 2005 has a handy little tool to help - Exception Breakpoints.

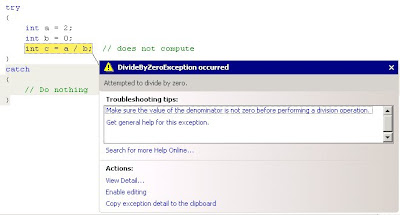
Say you have code that looks like this:


try
{
int a = 2;
int b = 0;
int c = a / b; // does not compute
}
catch
{
// Do nothing
}


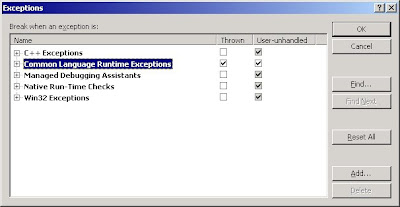
If you were to run this code, you'd never know that there was a problem (well, not until you tried to use the value of 'c' elsewhere.) What we want to do is have the debugger break as soon as an exception is thrown. To do this, open the Exceptions dialog, either through the menu (Debug > Exceptions) or the keyboard shortcut (Ctrl+D followed by E).


Under the Thrown column, check the box next to the Common Language Runtime Exceptions. Now, when an exception is thrown, VS immediately breaks at the offending line of code. One word of warning - Depending on the size of the code, you may find far more exceptions being thrown than you had expected.

Friday, June 29, 2007

Notes On Unit Testing

Lately, I seem to be spending a lot of time writing and updating unit tests. Along the way, I've made a number of observations. The syntax I'm using is taken from NUnit, but the ideas apply to any unit test framework.

1) If you choose to Ignore a unit test, note why it's being ignored and optionally how it is to be addressed. In NUnit, the attribute looks like this:

 [Ignore("We can't run this test until the hardware is in place")]


Not only is it easier for a dev to figure out later, but it will show up in the build report, making it easy to see the reason without opening up the code.

2) Similarly, use comments in all Assert statements noting the reason for the failure. Again the NUnit syntax

 Assert.AreEqual(expectedAge, actualAge, "Actual age doesn't match expected");


Without this, the NUnit report tells you that 12 didn't match 45, but it doesn't tell you whether you were comparing age or IQ.

3) Never copy/paste code. We all follow this rule in production code, but it is often ignored when writing unit tests. If every test requires a login before doing anything useful, move the login code to a separate method and mark it with a SetUp attribute. If some tests need to fail login, leave off the Setup attribute, but call the method from those unit tests that need it. Note also that you can use Asserts in these methods, so you can still verify proper execution within the methods.

4) Use constants whenever appropriate. If every unit test accesses the same server, move the server name to a string constant. This way, when you later shift to a new test box, you only replace one string.

5) Use a TearDown method to clean up after a test. Largely, this is to reduce the copy/paste of code (see item #3.) This also has to do with not using "try/finally" blocks. It is true that a failed Assert statement is simply throwing an exception. And technically, you could do code cleanup inside a finally block. But this isn't a clean solution (which is why the TearDown attribute exists.) One note: you may have to do some checking within the method. You wouldn't want to dispose a null object.

6) Never hard-code expected values from a database. I've seen numerous unit tests similar to:

 Assert.AreEqual(14, user.ID);


Primary keys are particularly problematic, but any field could cause issues, especially if users (or other unit tests) update values in the table.

One approach is to pull data using some other means. Perhaps by using inline SQL. Perhaps there's another stored proc or service that returns the same info. Either method means the tests don't need to be updated simply because the data changes.

A second approach is to use mock objects and avoid real data altogether. Assuming you've coded to an interface, you can use a tool like NMock or Rhino.Mocks to simulate data retrieval.

7) Test for exception cases using the ExpectedException attribute. There's no need to write a try/catch block, just to verify that a particular exception was thrown. ExpectedException can handle that for you, saving time writing code. One argument against it is that you can only test one exception case per test. You could instead have multiple try/catch tests within a single unit test. The problem here is that NUnit logs one error per test. If you have multiple errors, only one will be logged. You won't notice the other issues until the first has been addressed.

And Most Importantly:

8) Fix broken unit tests (Keep the unit tests current.) I've seen instances where unit tests were written to verify current behavior, but were then ignored as the code was modified. A large portion of a unit test's value comes from its ability to monitor code, flagging errors as soon as they are introduced.

Thursday, June 21, 2007

Stopping a COM+ Application Via the Command Line

I'm currently working on a project requiring multiple steps to deploy correctly. Being the efficient (aka lazy) developer that I am, I decided to automate some of the process. One step calls for stopping a COM+ application. I'm assuming there's a command line utility to handle this, but I've not yet found it. I tried consulting a friendly guru, but that didn't help. So, I was forced to write the VBScript below.

To use, create a new file, StopComApp.vbs, and add the following:

 dim objCatalog
set objCatalog = CreateObject("COMAdmin.COMAdminCatalog")

set args = WScript.Arguments
serviceName = args.Item(0)

objCatalog.ShutDownApplication serviceName


To use, run the following from the command prompt (or batch file):

 wscript StopComApp.vbs <AppName>

Sunday, June 10, 2007

A Useful Way To Launch WinDiff

A co-worker recently expressed his annoyance that certain tools installed with Visual Studio didn't have Start menu shortcuts. One in particular was WinDiff. In my experience, however, starting WinDiff by itself was never very useful. Once it was running you still had to browse to the files (or folders) you wanted to compare. I prefer selecting two items, right-clicking, and choosing WinDiff from the menu.

To set this up, create a new file, windiff.bat, with the following:
 "C:\Program Files\Microsoft Visual Studio 8\Common7\Tools\Bin\WinDiff.exe" %1 %2


Save the file to C:\Documents and Settings\<username>\SendTo

To use, select two files in the same folder. Right-click and choose Send To > windiff.bat. This can also be used to diff the contents of two folders.

Monday, June 4, 2007

Pseudo-changesets In SourceSafe

Let's say you make a code change that spans multiple files across several projects. When the change is complete, you need to check in all of the files at the same time. Otherwise, you end up with a broken build. Most source-control systems include the concept of a changeset. As you check out files, they are grouped in a specified set. After the modifications have been made and tested, you check in the changeset as opposed to the individual files. The bad news: SourceSafe doesn't include changesets. The good news: you can work around the limitation.

I previously added the MSBuild.Community.Tasks code to SourceSafe. Let's say I modified code within the XmlQuery task. This also required changing the unit tests. To see all of the relevant checkouts, select the folder common to both projects ('Source' in this case.)


From the menu, choose View > Search > Status Search. In the "Search for Status" dialog, select the options to display files checked out to you, in current project and all subprojects. Click OK.


The search results will look similar to this


Select the necessary files, right-click and choose Check In from the menu. Assuming you selected the correct files, the code should be updated without breaking the build.

Tuesday, May 22, 2007

VS2005 Item Templates

I've been spending a lot of time lately coding unit tests. If I were writing tests for a class named Chainsaw, I would start with a blank class file, and modify til it looks something like this:

using System;
using System.Collections.Generic;
using System.Text;
using NUnit.Framework;
using Pedro.PowerTools;
 
namespace Pedro.PowerTools.UnitTests
{
    [TestFixture]
    public class ChainsawUnitTests
    {
        ChainsawAdapter myAdapter;
 
        [TestFixtureSetUp]
        public void FixtureSetUp()
        {
            myAdapter = new ChainsawAdapter();
        }
    }
}

If you were to compare all of the TestFixtures in the assembly, you would find:
  1. For the most part, I have the same 'using' statements in each
  2. They all have the same namespace
  3. The class name for each TestFixture is the class to test, followed by "UnitTests"
  4. The data adapter name is the class to test, followed by "Adapter"

*Note - Yes, I'm testing several layers at once. Call it efficient. Call it lazy. It's simply my preference.

Though this isn't difficult to create by hand, there's an easier way - Item Templates. What I want is a way to right-click on my Project, choose Add > New Item, pick "MyUnitTests" from the list, and have it magically create the basic code. Turns out it's quite simple.

Start by placing the above code in a .cs file. Choose File > Export Template... from the menu. In the Choose Template Type screen, select "Item template" and the project where the .cs file exists.


Click Next. In the Select Item To Export screen, check the box beside the .cs file (ChainsawUnitTests.cs in my case.)


Click Next. Under Select Item References, check the box for nunit.framework. Ignore the warning.


Click Next. On the Select Template Options screen, enter the Template name and description. Make sure the box to "Display an explorer window..." is checked, and click Finish.


Once the template is generated, it will be placed in a .zip with the name of the template (for me, this is MyUnitTests.zip.) This is a decent start, but we need to modify a few things.

Open the .zip, and you should see the following files:
  • _TemplateIcon.ico
  • ChainsawUnitTests.cs
  • MyTemplate.vstemplate

Open MyTemplate.vstemplate. Near the end of the file, you should see the following <ProjectItem>

<ProjectItem SubType="Code" TargetFileName="$fileinputname$.cs" ReplaceParameters="true">ChainsawUnitTests.cs</ProjectItem>

In VS2005, when you choose to create a new item for a project, it asks for a filename. This filename, minus the extension, is placed in $fileinputname$. For this template, however, I want to type in the class to test, and have it generate a filename using the classname, followed by "UnitTests.cs". So let's change the line to

<ProjectItem SubType="Code" TargetFileName="$fileinputname$UnitTests.cs" ReplaceParameters="true">ChainsawUnitTests.cs</ProjectItem>

Save the file, and let's open ChainsawUnitTests.cs. It looks nearly identical to the original

namespace $rootnamespace$
{
    [TestFixture]
    public class $safeitemname$
    {
        ChainsawAdapter myAdapter;
 
        [TestFixtureSetUp]
        public void FixtureSetUp()
        {
            myAdapter = new ChainsawAdapter();
        }
    }
}

In fact, the only changes made were to the namespace and classname. Earlier, I mentioned wanting to type in the class to be tested, as opposed to the unit test class, when adding an item through the wizard. This is because I want to replace "Chainsaw" in each instance of "ChainsawAdapter" with the class I'm testing. As you may have already guessed, this comes from $fileinputname$. Two replacements and we have the following:

using System;
using System.Collections.Generic;
using System.Text;
using NUnit.Framework;
using Pedro.PowerTools;
 
namespace $rootnamespace$
{
    [TestFixture]
    public class $safeitemname$
    {
        $fileinputname$Adapter myAdapter;
 
        [TestFixtureSetUp]
        public void FixtureSetUp()
        {
            myAdapter = new $fileinputname$Adapter();
        }
    }
}

Save the changes and re-zip the files. Drop the .zip in your custom ItemTemplates folder (the location can be found and/or modified in the VS Options dialog, under "Projects and Solutions" > "General." Having done all that, go back to the test project in VS. Right-click on the project and choose Add > New Item. In the Templates dialog, you should see your new template near the bottom of the dialog. Enter "DrillPress.cs" into the Name textbox and click Add.

Assuming all went well, VS should generate DrillPressUnitTests.cs with the following content:

using System;
using System.Collections.Generic;
using System.Text;
using NUnit.Framework;
 
namespace test1
{
    [TestFixture]
    public class DrillPressUnitTests
    {
        DrillPressAdapter myAdapter;
 
        [TestFixtureSetUp]
        public void FixtureSetUp()
        {
            myAdapter = new DrillPressAdapter();
        }
    }
}

Friday, May 18, 2007

Reducing the size of ccnet.config

[Update 5/19/09: The latest version of CCNet makes this much easier by using a Configuration Preprocessor. I have a short writeup here.]

My demo setup only contains two projects, and there are already a few items that have been duplicated. Items such as paths to SourceSafe and MSBuild executables. As you add more projects, you find yourself copying and pasting lots of info. This isn't recommended when writing code, so why should a config be any different?

Let's take a look at the sourcecontrol blocks. First, my still-empty custom tasks project


<sourcecontrol type="vss" autoGetSource="true">
<ssdir>c:\vss</ssdir>
<executable>C:\Program Files\Microsoft Visual SourceSafe\ss.exe</executable>
<project>$/MSBuild.Chainsaw.Tasks</project>
<workingDirectory>MSBuild.Chainsaw.Tasks</workingDirectory>
</sourcecontrol>

Then the MSBuild Community Tasks


<sourcecontrol type="vss" autoGetSource="true">
<ssdir>c:\vss</ssdir>
<executable>C:\Program Files\Microsoft Visual SourceSafe\ss.exe</executable>
<project>$/MSBuild.Community.Tasks</project>
<workingDirectory>MSBuild.Community.Tasks</workingDirectory>
</sourcecontrol>

Both <ssdir> and <executable> are identical. To simplify things, add the following to the top of the config (above the opening <cruisecontrol>)


<!DOCTYPE cruisecontrol [
<!ENTITY ssCommon
"
<ssdir>c:\vss</ssdir>
<executable>C:\Program Files\Microsoft Visual SourceSafe\ss.exe</executable>

">
]>

Now, those sections can be replaced with "&ssCommon;", like so


<sourcecontrol type="vss" autoGetSource="true">
&ssCommon;
<project>$/MSBuild.Chainsaw.Tasks</project>
<workingDirectory>MSBuild.Chainsaw.Tasks</workingDirectory>
</sourcecontrol>

Adding FxCop to the build

Most (though certainly not all) developers agree that code reviews are a useful step in the development process. I won't go into specific benefits, as there are numerous writings on the subject.

One of the downsides, however, is that code reviews take time. In fact, you could spend more time reviewing the code than you did writing it. This is where FxCop can help. Though it won't catch problems with things like business rules, it does flag various issues related to performance, security, and code consistency/maintainability. By adding it to the build, we get a decent code review with every checkin.

For this demo, I downloaded the source for the MSBuild Community Tasks. Dropping this into SourceSafe, I set up a new project in CruiseControl.Net.


<project name="MSBuild.Community.Tasks">
<sourcecontrol type="vss" autoGetSource="true">
<ssdir>c:\vss</ssdir>
<executable>C:\Program Files\Microsoft Visual SourceSafe\ss.exe</executable>
<project>$/MSBuild.Community.Tasks</project>
<workingDirectory>MSBuild.Community.Tasks</workingDirectory>
</sourcecontrol>
<tasks>
<msbuild>
<executable>c:\winnt\Microsoft.Net\Framework\v2.0.50727\msbuild.exe</executable>
<projectFile>MSBuild.Community.Tasks\Source\MSBuild.Community.Tasks.sln</projectFile>
<buildArgs>/noconsolelogger </buildArgs>
<logger>c:\ThoughtWorks.CruiseControl.MsBuild.dll</logger>
</msbuild>
</tasks>
<publishers>
<statistics/>
<xmllogger/>
</publishers>
</project>


To add FxCop, we first need to create a project file. Start FxCop. From the menu, choose File > Save Project. Out of laziness, I saved the file as c:\DefaultRules.FxCop. Now to update the build file. Below the <msbuild> section, add the following


<exec>
<executable>C:\Program Files\Microsoft FxCop 1.35\FxCopCmd.exe</executable>
<buildArgs>/project:"C:\DefaultRules.FxCop" /fo /q /searchgac /file:"%CCNetWorkingDirectory%\MSBuild.Community.Tasks\Source\MSBuild.Community.Tasks\bin\Debug\MSBuild.Community.Tasks.dll" /out:FxCopLog.xml</buildArgs>
</exec>

Within the <publishers> section, add


<merge>
<files>
<file>FxCopLog.xml</file>
</files>
</merge>

Save these changes and force a build - which fails. Looking at the project report, it looks like everything should have worked. We even have FxCop information on the page. The Build Log, however, notes the missing dependency Microsoft.VisualStuido.SourceSafe.Interop. The assembly isn't being copied to the build output folder.

To fix, open the .sln in VisualStudio. Under the project's References, select the missing interop and set the Copy Local property to True. Checkin the modified project and you should see a successful build.

Now we have FxCop info displaying on the Build Report. We also have a detailed FxCop Report we can access from the Dashboard's menu. Which is all well and good, but the reports aren't the most useful.


Fortunately, you can download alternative stylesheets from the Thoughtworks site. Unzip fxcop-summary.xsl and FxCopReport.xsl, and place in \webdashboard\xsl\ under the cc.net install directory. Open FxCopReport.xsl in your favorite xml editor. Replace all instances of

src="images/

with

src="/ccnet/images/

With the new reports in place, reload the dashboard. If all goes as planned, you should see slightly improved FxCop reports. Note these still aren't perfect, and there are likely others available on the web.


Monday, May 7, 2007

Continuous Integration = Consistently Compileable Code

*Note: This is a continuation of my previous post

"Now that we have basic SS usage defined, where does CC.Net fit into the picture?" Simple - it's what makes sure the code is in a usable state at all times.

Let's say you've finished creating the xml logger and checked everything in. But say you forget to check in one file. Everything builds on your machine, so you don't see the problem. You're pulled from the project and another dev comes in later to continue. Only, when he gets latest and attempts a compile, he receives a number of build errors. Now he wastes time tracking down the cause of the problem - a missing or outdated file - and who might have that file. Maybe you have the file, and he's wasted fifteen minutes. But say you no longer have that file. Now your colleague wasted that time, only to find out someone will have to recreate the work.

Say instead you are working on code at the same time as another dev. His job is to create the data and business layers, while you focus on the front end. Somewhere during development, your colleague decides to modify a few method signatures. Methods that you happen to be using. And your colleague fails to warn you. At some point you'll get latest, only to find that you can no longer compile your code. It's likely that both of you must stop what you are working on and get the build back into a good state. If there are only two of you, it might take twenty minutes. As the number of devs on a project increases, the time required to restabilize the code likewise increases.

I previously worked on a project that had over a dozen developers. Due somewhat to poor architecture, a break anywhere caused problems for the entire team. The choices were to get latest and spend the morning stabilizing the build, or using outdated code, which meant integration later became even more difficult.

Fortunately, these problems are easy to address using CruiseControl.Net. Its job is to monitor the source code repository for any changes. As soon as a change is made, CC.Net gets latest and rebuilds the code. If the compile fails, everyone on the team is immediately (within a few minutes anyway) notified of the failure. The dev who checked in the broken code can address the problem, and other team members know not to get latest for the moment.

Regarding a broken build - if you aren't working on a fix, stay away from the repository. Getting latest means the code on your box will no longer compile. Checking in code may make things worse. It's best to fix one build break before possibly introducing another.

One more thing - if you break the build, fixing it should be your top priority. If you check in code at the end of the day, hang around to verify the build is still good. If you're in a hurry and can't wait for the build, don't check in the code. You're more likely to forget something in your haste, increasing the odds of a break.

Thursday, May 3, 2007

Source Code Control 101

At work, we're moving toward a more standardized development process. Part of that standardization is on the usage of SourceSafe for source code control, and CruiseControl.Net for continuous integration (CI.) The developers on the team come from a variety of backgrounds, and have different levels of experience with CI. As the resident Build Guy, I've spent the most time with the tools and decided to lay out my thoughts on the process.

*Note that these are not the only tools available, and with SourceSafe in particular there are certainly better options. These are simply the tools we are working with.

*Note also that I intended to cover both SS and CC.Net in a single post. It ended up a bit longer than expected, so I'm splitting it into two entries. This post is limited to source code control. The next will dig into continuous integration.

SourceSafe as version control

SourceSafe is not merely a way to back up code in case of hard drive failure. It is a way to revision your code. It allows you to define checkpoints in completed work. It provides an easy way to compare changes and roll back work if you find yourself going down the wrong path.

For example, let's say you're updating a desktop application. The current app generates a text file as output. The goals for the next release are to enhance the logging and to generate xml instead of plain text. To start, you decide to replace the existing log with xml. Looking at the code, you realize the log messages are scattered throughout the entire app. Unless each message is to be a self-contained element, this makes it difficult to generate well-formed xml.

So you begin by creating a custom logger class. This lets you track where in the xml tree you are, and ensures the output is well-formed. After you've finished testing the logger, it's time to replace all of the old logging code with calls to the new class. Right?

Not just yet. Now that you have working code it needs to be checked into SourceSafe. "It doesn't do anything yet," you say? True. However, even though the class isn't used, it's still a functioning piece of code. If you have to switch projects now, you know you can come back later and pick up with a working app.

"What if you need to make a bug fix and release to production?" The code isn't being used, remember? So there shouldn't be an issue.

With the logger checked into SourceSafe, it's time to replace the existing logging code. At the start, everything seems fine. But several hours into the process, you realize something. It appears there's a bit of rarely-used code that logs info in a non-trivial, non-standard way. No problem - you can update the xml logger to deal with the new info. A few changes, which you of course check into SS, and you're back to replacing code. But shortly thereafter, for whatever reason, you realize the logger changes shouldn't have been made. Now what?

Fortunately, the previous revision exists in SourceSafe. It's easy to roll back the code and continue with your work. But say you hadn't checked in the changes? Instead, you would have had to manually modify the code until you were back to the point you were before. If you've ever tried this, you know it's not often a trivial matter. It certainly takes longer than the minute or two required for a SourceSafe rollback.

SourceSafe allows collaboration

Most software projects involve several team members contributing code. This requires some means of getting updated code to the other developers. It may also require a new developer to come in and pick up where another left off.

Going back to the xml logger, say you have the logger code checked in and are pulled off to work on another project. A new developer comes in and is tasked with replacing the old log code. All the new guy has to do is get latest from SS and he can continue right where you left off. Or maybe he comes in at the point where you've added to the logger (just before you realized those changes weren't necessary.) Once the new guy figures out what's going on, it's as easy for him to roll back the code as it would have been for you. There's a clear snapshot of where the code was before the change.

Checkin frequency

So you now see a few benefits of source code control. The next question you may have is "How often do I check in my code?" It depends on what you are doing, but the general answer is "Often." A few times a week is typical, and multiple times a day is entirely possible. The key is to find stopping points throughout the project.

Say you start coding a new multi-tiered application. You begin by writing a few classes in the data layer, making sure you can connect to the database. As soon as you have these compiling and running correctly, check the code in. As you add new classes, check them in. There's no reason to wait until the entire layer is code complete.

Say instead you are working on a desktop application. You begin by placing a few controls on a blank form. Maybe you hook those controls to business logic. Or maybe you prefer to setup the layout before making the code do anything useful. Either way, each piece of logic and each set of controls define a discrete unit of work. Hook up a couple buttons and check the code in. Add logic to traverse the local hard drive, then check the code in. With a bit of practice, you should recognize several good checkin opportunities on any given day. That's not to say you need to check code in this often, but once a day is certainly possible.

One final thought - before checking in the code, make sure it compiles and runs on your box. Checking in code that doesn't compile only hinders development. I'll cover this next time when I introduce continuous integration using CruiseControl.Net.

Friday, April 27, 2007

CC.Net - Project Report Page

In CC.Net, the Project Report page provides general information for a project.


Most of the items should be straightforward. One thing you may notice is that the "View Statistics" link doesn't work. Clicking the link gives an exception page stating "Object reference not set to an instance of an object." The problem is that the <statistics> publisher wasn't specified. Add the following to ccnet.config, within <project></project>

    <publishers>
<statistics/>
</publishers>
Reload the page... "Unexpected exception caught on server." The other pages now fail with the same error. Not exactly the desired results. Digging through the exception details, it appears the Log Publisher is missing. Yet it was there a minute ago?

It turns out a default publisher is used if one isn't specified. You can see this by removing the <publishers> section and clicking Project Configuration on the left. This page gives the project's entire XML listing, both the entries in ccnet.config and any defaults you don't override. A useful addition.

Anyway, the publisher error is a simple fix:

    <publishers>
<statistics/>
<xmllogger/>
</publishers>

The pages again load. On top of that, we now have statistics. Or, will, as soon as we run another build. Force a build, and you should see basic stats for the project.


Nothing fancy, but it's a start.

One more useful feature is the External Links item. With this, you can easily add links to other resources - project documentation, bug server, etc. Again, this is added within <project></project>

    <externalLinks>
<externalLink name="Project Documentation" url="\\fileserver\project1\project.doc" />
</externalLinks>